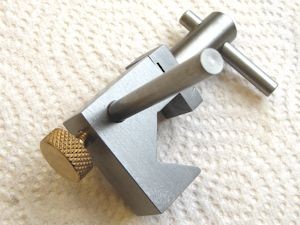
Bought one of these from Amazon for £14.99. Not really expecting too much as the real thing from Noga is usually in excess of £100.00. First thing I did was to stand it on a surface plate to check if the base was flat – it wasn’t! Quite a noticable wobble so I unbolted the arm, removed the magnet and trued up the base. The base seem to be made from two steel parts which sandwich a thick central section made from some soft alloy which I suspect is a lead / zinc or similar mix. Looks like the soft alloy is poured in hot to fix the two outer bits together. A large round magnet sits in the central hole and is rotated by the front lever so that sides are magnetised or not. It has quite a reasonable hold when switched on.
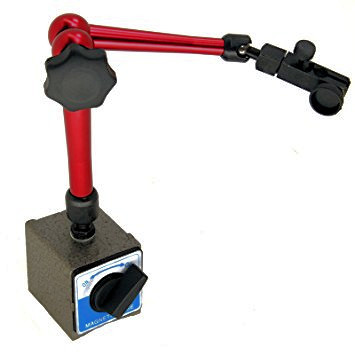
Put the base in the mill and machined it flat, it now sits nicely on the surface plate without rocking. Quite how you can surface grind something with a wobble I don’t know but looking at the original finish it may well have been done by hand on a belt sander. The general finish is pretty well down to the same standard. Looking at the photo you may well think the arms are anodised aluminium. Wrong, they are aluminium but are varnished with a semi-transparent lacquer. The finish on the arms is very soft and easily scratched. The black paint on the base is also fairly soft and covers a deal of filler. The clamping action isn’t very smooth so I took the whole thing to pieces and cleaned it up a bit. The arms are assembled with circlips, well bits of bent wire, there are four of them each one a different diameter and different length.
Once apart the action becomes evident, as you tighten the centre screw two wedges engage with the tapered ends of the rods that run up the middle of the arms. The rods push against the steel balls that make up the pivots. I could tell they were steel because they were rusty! The ball joints were also very rough with a good selection of dents. Polished them up on the lathe to improve the action somewhat. The ends of the push rods were also fairly rough so I polished up the wedge end using a fine diamond lap. I also polished up the wedge faces in the same way. All the originals looked as though they had been done either on a belt sander or an off-hand grinder. Also cleaned up the dimple end of the rods on the lathe using the ball to push a bit of wet and dry paper into the depression in the rod end.
Reassembled everything with some lubrication where needed and it seems a little smoother. I still have to turn the clamp knob quite hard to lock all three joints really solid but it is plenty stiff enough to support a DTI. Was it worth the money? Only just, if I hadn’t had the means to adjust it it would have been no use at all.
 I bought myself a new precision milling vice from Arc Euro Trade and quickly discovered that I needed to make a couple of clamps to hold it to the table. Quite a straightforward job you may think but even the simplest task can go awry if not carried out in the right order. Read how it should (or shouldn’t) be done!